....................................................................................................................................................................................................................................................................

Wednesday, April 27, 2011

Colson | Newborn Session (+ BTS look at "On Location")

In addition to sharing photos from my latest newborn session, I've decided to walk you through what an "on location" newborn session looks like for me. Being that you know how I prepare for infant photos from a previous post,  I now want to take the opportunity to share what I do once I get myself (and my overly prop-packed Volvo) to that sweet little baby's house. I suspect that what I do now will continue to change as I learn what does and doesn't work for me. What works for me may not work for you. I love the idea of sharing and tweaking. I share and you tweak. I will most definitely admit that I've tweaked what others have shared to fit my style and needs. As life long learners that's what we do. 

On the Shoot  (Newborn Session) :

  • Mom & Dad talk: As I refrain from knocking down the door to get inside to see that wittle bitty baby, I take a moment to mentally prepare in the driveway. Once I contain the excitement I go in and talk to mom and dad. I express my excitement and appreciation and tell them what to expect for the day. After that, I bring in my props.
  • Finding good light: Once I have all my props unloaded in the house I go on a hunt... a hunt for light! Good, natural light. I check in front of all the doors and windows throughout the house. Before I go into the house I check to see what side the sun is on. The sunny side guides me in determining the best window or door to use as my natural light source. 
  • Moving furniture: Yes, I rearrange the house. I apologize in advance to mom and dad for turning their once nested house upside down. In an attempt to capture good photographs they gladly sacrifice.  I move any furniture out of the way in order to set up shop. I've even moved a dining room table (Wanna see? Find the baby on the scale photo from this post)
  • Set up shop: Now that I have my naturally lit spot in front of a door or window chosen, I set up my bean bag and blanket backdrop. The bean bag is essential! I was so thankful when I stumbled across a newborn photography blog that shared that secret. I use the back side of dining room chairs to hold up the blanket. I'm hoping to invest in a backdrop holder soon.
  • Finding walls/floors for backdrops: After I've gotten the bean bag in place I do more hunting. I look for other spots to take photos. I check for walls and floors that would provide adequate backdrops for photos using baskets/buckets. Be creative and have fun with it.
  • Heater: Before I get the baby into position I set up a space heater in front of the bean bag. I do this because cold babies = crying babies. Sometimes, I undress the baby in front of the heater as well. They like it to be as similar to mommy's womb as possible. It's not a bad idea to have mom and dad crank up the heat an hour or two before the session. Be prepared to get your sweat on. 
  • Handling the baby: OH, my favorite part! Once everything is in position and I have a plan, I warm up my hands (after they've been washed, of course) and get the baby ready for the session. When handling the baby I do everything slowly and gently. Babies do not like to be cold, so when I move them from place to place I keep them close to my body, just like mom. Sudden movements can easily disturb their sleep. Every movement during positioning must to be soft and slow. I do a lot of "shhhhing" to keep the baby calm. It works! 
*** Warning: There is a 99% chance you will get pooped or peed on, possibly both  :)

Happy tweaking! 

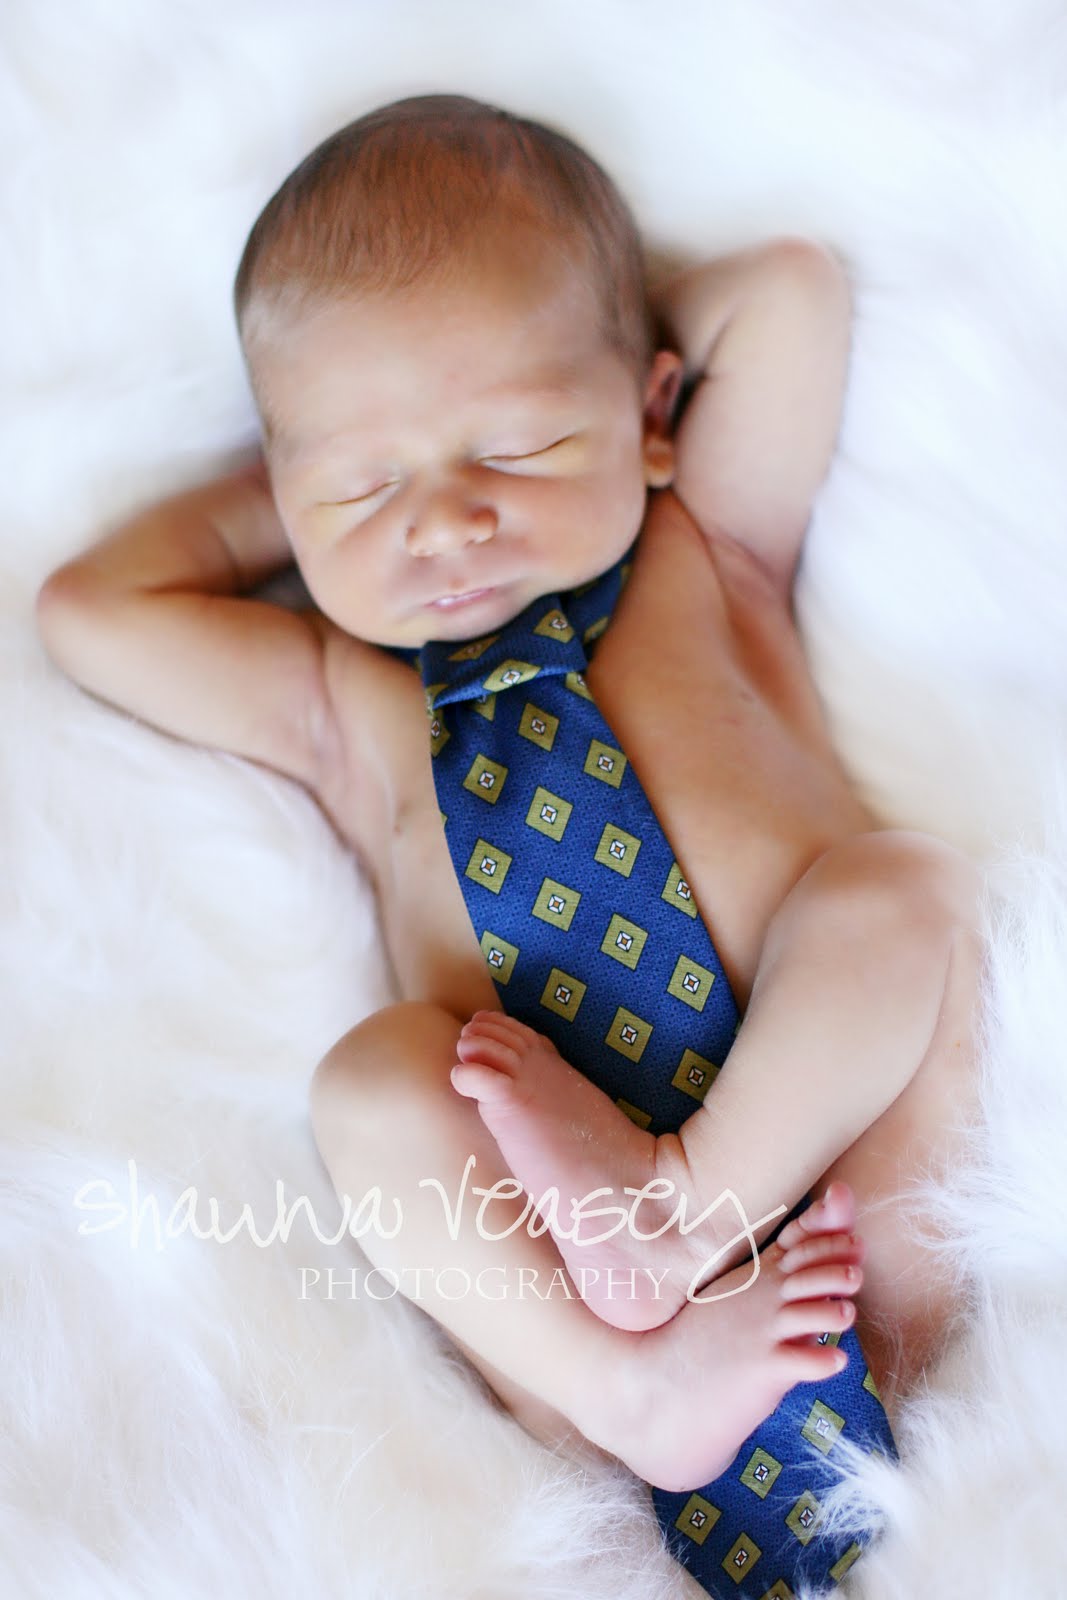
Check out Mr. Colson. He was such a good baby. Congratulations Kristy and Brian, you are so blessed to have such a beautiful baby boy. Thank you for giving me the opportunity to capture his first days of life. 


Stay tuned for an upcoming blog post on my editing process and techniques. 

If you have any questions about what I've shared, please leave a comment. I hope to have another FAQ post soon :)

Saturday, April 16, 2011

FAQ

As I continue to learn new things, I aspire to share with others. I think exchanging information is essential to my growth and development as a photographer (I still feel silly referring to myself as that. I'd feel more comfortable saying "want-to-be photographer" but Brandon insists that I am one-  I guess I'll play along). I learn from reading others' blogs and asking questions so, naturally, I figured what better way to give back than to do the same for others. With that said, I'd like to share my very first Frequently Asked Questions post. I hope this catches on and results in many more to come.


What camera do you recommend for a beginning photographer?

I get this question a lot. Believe it or not, I don't recommend the same model camera that I started with, not because my camera wasn't/isn't great to me, but because digital SLR's are continuously getting better and better. My camera was a gift from my husband who knew that I desired something a little fancier than my point and shoot. I wanted something that would capture better quality pictures of our son. Who knew four years later it would have resulted in something more? Not me :) Now, after much research, (because I'm in the process of upgrading myself) I think the Canon Rebel T2i would be a great starter camera for any beginner. I'm a Canon girl so I am most knowledgeable with their models but I feel that the similar Nikon model would be equally as efficient. Why the Rebel T2i? Many reasons, but in a nut shell: it's VERY user friendly, high megapixels (crisper photos), 3.7 frames per second, 12800 ISO (helps for shooting in low light), movie mode, etc. This camera has  many professional capabilities for a reasonable price ($800ish). I have recommended this camera to 3 people who have gone through with the purchase and all 3 are very pleased with their cameras. 

How did you design your website, or did you buy it?

Both I guess. Technically I didn't design it, I bought a template and tailored it to fit my style/theme. A fellow photographer shared PhotoBiz.com with me and now I share it with you (Thanks Renee Hicks). PhotoBiz has over 100 templates to choose from and will host your site for $15 a month. Unbeatable! I think launching my website was a huge move forward for my photography business and I highly recommend anyone who is debating it to go for it. 

Where did you get your domain (www.shaunaveaseyphotography.com)?

GoDaddy.com. I think it costs $5 a year. Once I designed my website and bought the domain I connected the two. Photobiz and GoDaddy are both helpful in making this process a breeze.

How do you get the subject of a photo to be clear and the background blurry?

When I started, this was one of the first things I think I Googled. I desired that creamy smooth background oh so badly. Being the Google Queen that I am, I did a little research and taught myself about aperture and how it works. For the sake of time, I would like to refer you to this link here. Happy reading.

What mode do you shoot in?

What a great transition from the previous question. Just like everyone else, I started in "auto." Honestly, I think that's the only place to start. Once you get to know your camera, you can make the switch- test the perimeters a little. Now, I shoot primarily in "P" mode, which stands for "Aperture Priority." This mode allows me to manipulate the background blur to my liking.


How do you make your watermark (logo/signature on the photos)?


It would have been great if I had the means to pay a graphic designer to make one for me, but I don't. Oddly enough,  I'm okay with that. Because I like designing things, I decided to figure it out myself. I make my watermark using Photoshop. Don't cringe, it's totally doable :) First, I open a text box on the photo and choose a font that I like, you can change the size and color as well. I like white. Next, I find the font I want for my name and a different font for "photography." I open two different text boxes: one for "Shauna Veasey" and the other for "Photography." Doing them in separate boxes allows me to position the words where I want them. Finally, once I have the words in place, I change the opacity of each box to give the words a more faded look. I always make sure the opacity of both text boxes match. I do this for every photo that I publish online. I'm certain that there is a way around doing this every single time but I haven't figured that out yet. Anyone who knows how to do this, I would love for you to share your secret.


I hope that this was helpful, and if you have any questions please feel free to leave them  below as a comment. 

And of course, a post wouldn't be as enjoyable without a picture. Check out little Camden, he's straight chillaxin. 

Tuesday, April 12, 2011

Picks + Passes

What do you know, I'm on a blogging frenzy. Where is all this blogging energy coming from? Well, a few places: teaching has slowed down a bit (only 7 more weeks!), the house is clean, clothes are clean (notice I didn't say put away, darn it), Ariston is asleep and I am awake. What a perfect opportunity for another Picks + Passes. And we're off...

PICKS :
  • My brand spanking new pair of running shoes: New Balance Vibrams. I bought the gray ones. Embarrassingly enough, I haven't bought myself new tennis shoes in approximately 5 years. The old ones were getting a little, well, old. I like the NB Vibrams for their sock-like comfort and rugged look. The design is inspired by the yoga shoes with the separated toe slot thingies. I'm not so sure I like those, but these, float my boat. Since I've been working out regularly for the last 4 months (minus this last week, arg), I feel like I earned these bad boys. The price was a little steep but they are worth.every.penny.  (Shout out to the best shoe place around the Coweta/Fayette area, Smith & Davis, for saving me a few bucks!) Did I really ramble that long about my new shoes? Forgive me. 
  • Family vacations. The ones where you pack up and drive to the beach with no plans, no obligations, and absolutely NO reason to not spend true quality time with the ones you love. I've included a few photos of our most recent getaway below.
  • Jasmine Star's FREE 2 day workshop. Ah, she's amazing. If you're interested in photography, or just viewing some amazing wedding photographs, I highly recommend you check her out. Prepare to have your mind blown by her sheer amazingness. I only caught the 2nd day of her workshop. I'm highly anticipating the next.
  • I heart burlap. Yes- that scratchy, itchy, earthy, khaki fabric that screams, "I love antiques, too." I bought a few yards a while back. It serves 2 purposes, 1. kitchen tablecloth and 2. photo backdrop. I'm predicting it will serve many more in the future. My last post, here, has a few photos where I used the burlap as a backdrop- the photos with the tan background.
PASSES :
  • Pollen, it's you that I despise. Not only because you make my eyes itch, nose run, and head hurt. It's so much more than that- you make my once clean car dirty, I can't swing on my front porch because you've coated everything in your yellow nastiness, AND you've caused my husband to go into "Babe, I'm so sick. No, I don't really need to go to the doctor" mode. Get out of town already!
  • Not having a family photographer. I want one.
  • Gel polish. Let me just say, I thought this stuff was the next best thing to be invented for nails. It hardens your natural nails without having to apply that awful acrylic gook (that smells awkwardly delightful). I'm certain it would have been on my picks list, at least, BEFORE I removed it and realized how awful it was. It's great while it lasts but the damaging effects aren't as enjoyable. The gel polish left my nails cracked and peeling. Sad face.
  • I should have another "pass" since I'm sort of freakish about things being even, BUT, I can't come up with anything else at the moment. At least I have 4 bullets, that makes me feel better. Maybe it's a good thing that I have more picks than passes? Tonight, the glass is half full.


Sunday, April 10, 2011

Camden | Newnan, Ga Newborn Photographer + BTS

I fell in love, again. Okay, okay, YES... I knew it was coming. Who couldn't fall in love with a sweet little fellow only 8 days new? I can't resist it. It's inevitable. 

I want to back up a little and give you guys a run through of how I prepare for a newborn session. Before I do so, I'd like to preface it by saying that newborn photography is unlike any other. The challenges are very unique. I'm learning that newborn photography takes a significant amount of patience and practice. Doesn't anything challenging require those two things, at least? Yes. So knowing this, I am still learning how to capture the images that I seek. I'm growing, and it feels good. I want to share what I do with you. I'm not saying it's the right way, but just that this is how I do it, and it works for me (as J* would say).

Before shooting day:
  • Shop: Anyone who has looked at newborn photographs knows that what makes them so amazing are the props used to enhance the personality of the photographs. I shop for baskets, bowls, fabric for backdrops, throws, buckets, wraps, hats, scarves, headbands, etc. As you can imagine, the list goes on. As the list goes on, you can see that it can also get pricey. I'm learning that there is nothing cheap about photography. I tell myself that once I have a good amount of props I'll be set... but the truth is, photographers always want more as there is always something newer, better or cuter. Where do I shop? Etsy.com, TJMaxx, Garden Ridge, Marshalls, Hobby Lobby, Antique stores, fabric stores, and online boutiques. (Oh, and  my grandparents' basement too!) 
  • Plan/Research: Let's be honest. Where do we get most of our inspiration as artists? From each other! I would have never even known about newborn photography (or photography of any sort) if I hadn't observed someone else's work first. That's the beauty of it. I take ideas from other photographers that I like and I tweak them to make them my own. I put my personal touch on it by the choice of props, locations and editing techniques. Before every session, I sit down with my laptop and notepad (maybe a cup of tea or coffee, too) and make a list of poses that I want to capture. Why? Well, I'll admit I haven't always done this. I lived and I learned. When I'm wrapped up in photographing that sweet bundle of joy it's SO easy to forget poses. The worst feeling in the world is sitting in front of a sleeping newborn, camera in hand, and drawing a blank on what to do next. By having a list to refer to, things run smoother. Not only that, but arriving prepared with a list makes me look more professional.  No brainer, right?
  • Prepare equipment: Because I've prepared a list of poses, I know what props I'm using.   Knowing this, I get everything ready the night before. I run through my list, checking it twice (like ol' St. Nick). I charge batteries, clear memory cards, clean lenses, and pack my camera bag so it's ready to go. And then, I get a good night's sleep :) 
Newborn photography has brought me so much joy. Pairing photography with a newborn is pure happiness in my book. Coupling the two is something I'm truly passionate about. I can't express the level of excitement that flows through my body before I meet that tiny, new addition to this great big world. 


My session with Camden was such a success. A big thanks goes out to his amazing parents, Craig and Chandra, for helping me get it done. They were such great helpers! They handled me rearranging their entire house like pros. Hey, we do what we have to do to make magic happen. Good news, everything went back just the way it was before my arrival (minus a few little pee spots, haha). Craig and Chandra- Again, congratulations! He is perfect. 
                                                             World, meet Camden.