....................................................................................................................................................................................................................................................................

Thursday, September 29, 2011

Maris Goes to Paris | Newnan, GA Photographer

Maris's GiGi did something really cool- she wrote a children's book featuring her own granddaughter! Jane, Maris's GiGi, said she was inspired to write Maris Goes to Paris because when people asked how to pronounce her granddaughter's name she'd always respond by saying, "It's Maris, like Paris." Low and behold, she decided to write a book about  just that- Maris traveling to Paris to visit her GiGi. Is that cute or what?!

So, where do I come into play? Well, Jane's publishers requested a portrait of her to include on the back of the book cover and guess who Jane called... me!! :) Because Maris Goes to Paris was inspired by her grandaugher, Jane knew she wanted to include Maris in the portrait. After all, Maris is the main character of the story. Maris Goes to Paris is in the illustration phase of publication. I will let you all know when you can find it in stores. Below I have included a little blurb from the book.
In a small French village there lived a little girl named Maris. Maris was a happy, adventurous girl who loved to have fun. One day while playing in the yard with her little black cat, Mishi, Maris saw her mother step onto the porch.  
“Maris, Maris, come inside,” her mother called. “I have something for you. Your grandmamma Gigi has invited you to visit her in Paris."

Oh, I can't wait to read it! Doesn't it sound so cute? I'm so anxious to see my work on the back of a book. Fun, fun! Now, check out those pink cowboy boots. Maris sure does know how to make a statement.


Tuesday, September 27, 2011

Tuesday Tip

This Tuesday's Tip was inspired by a question I received last week from a friend of mine. She asked, "When is the best time of day to take outdoor pictures/schedule sessions?" 

Typically I schedule sessions at 10 o'clock in the morning. Why? Well ... this particular time of day has so much to offer! Allow me to elaborate ;)

1. Soft Sunlight : My first concern is always the sun (the sun and I have a serious love-hate relationship). In my opinion, images look the best when they are taken in a softer light. Mornings and evenings are obviously when you can catch the sun at its best for photography purposes. Anything between 12 and 3ish is way too harsh for my liking. Although I always go straight to the shade (to prevent face shadows, squinty eyes and washed out skin tones), I usually plan for morning sessions. 

2. Happy, Well-Rested, Non-Hungry Children : From my experience as a mother, teacher and photographer, children feel their best during the morning hours. They have had a full night of sleep and have eaten breakfast- rested children who have been fed always  feel better than those who haven't. Evening sessions with children tend to be a little more challenging. Trust me ;)

3. Temperature : I find that morning temperatures are more enjoyable than evening temps, especially during the summer months in southern states. 

4. Just Enough : 10 o'clock is early enough to spend the first few minutes discussing outfits and developing a plan for the session. I'm usually shooting by 10:30. If I start shooting at 10:30 I have just enough time to get the shots I need before the sun gets too high (no bueno).

Although I prefer morning light, I want to add that evening sessions can also be great. It all depends on the client. I find that engagement sessions are nice in the evening (I plan for 5, shooting by 5:30). Evening hours set a more romantic mood. 

Below I've included 2 images. The first is from a morning maternity session and the last is from an evening wedding. I hope this helps :) Happy shooting!


Tuesday, September 20, 2011

Tuesday Tip

Recently I've been brainstorming avenues in which I could share little photography tid-bits  with my readers. I knew I wanted it to be something I posted regularly on my blog, but envisioned it becoming a quick and easy tip that anyone could execute with their camera. Quick to read and easy to apply. Win-win, right? Finally, I came up with "Tuesday Tip." (oh how I love alliteration- can you tell I'm a teacher?)

My plan: Each Tuesday I'm going to share a little tip with you guys to enhance your photographs. I intend for these tips to be easy enough for anyone to use. So, whether you're a mom seeking better photographs of her kids, or someone looking to pursue photography, these tips can assist you (hopefully). People ask me all the time, "What's this?" or "How did you get your picture to look like that?" As I've said in the past, I think the most  effective way to grow is to learn from others and then share what I've learned. You know, spread the love a little. I never liked secrets anyways. 

This week's Tuesday Tip:

  • When taking a photograph of a subject in front of a solid background (i.e. wall, door, window, building, etc.) move the subject at least 3 to 5 feet away from the backdrop. Why? By moving the subject away for the solid surface behind them,  you're going to enhance the subject. By doing this, the subject becomes the focal point rather than another object getting lost in the background. To take it a step further for those of you who are comfortable manipulating the aperture, moving the subject further out will create a smoother, blurrier background giving your subject the crisp pop that you want. The more depth of field (distance between the nearest and farthest objects that appear), the more bokeh (blur). I've included these as links if you want to learn more.
See, not so bad, right? Bringing a subject off of it's backdrop was one of those huge realizations for me in the beginning. Trial and error of not getting the blur that I was seeking inevitably lead to me doing enough research and practice until I got it. 

Below I've included two images that'd I've recently taken. In the first image there is no distance between the subject and the backdrop. In the image below it, I've moved the subject about 5 feet away from the door. Can you see the difference? Although small, it counts. 

Thanks for stopping by and I hope this helps! Feel free to drop a comment or question, I love love LOVE to hear from my readers :)


PS- I will be blogging about this little cutie pie later on in the week- and, guess what... she is having a book published about her and I have a little snippet of it to share. You're going to love it. Stay tuned. 

Monday, September 19, 2011

Sunday, September 18, 2011

Harris | McDonough, Ga Family Photographer

A few weeks back I got to meet the Harris family. Jessica and JC are the proud parents of an adorable little boy, Hudson, who is about to have his 2nd birthday. Doesn't he have a rockin' name? I think so! Hudson is at the "on-the-go" stage. I got to spend the day chasing him around, making funny noises and even funnier faces. Check out Hudson and his folks...


And I leave you with one of my new favorites (because we've all had one of these days). If you ever want to know how I can tell that a session is coming to an end, this photograph says it all. Bless his little heart.

Wednesday, September 14, 2011

Nightly Occurrence

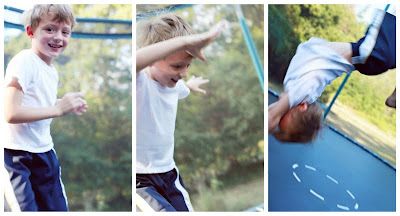
"Mom, let's jump," Ariston pleads as he pulls on my arm while I begin washing dishes. Every evening after dinner the persuading ensues. His father and I can count on one of two requests: playing soccer or jumping on the trampoline. "As soon as I finish cleaning up we'll come jump with you," I reply. "Promise?" "Promise."


Tuesday, September 13, 2011

DIY :: Succulent Terrarium

     Ok, I have to confess: I've been wanting to do a DIY post for a very long time. Why the wait, you may wonder. Well, I thought maybe by posting DIY projects my blog would be a little, well, all over the place. And then I realized, it's already all over the place. Just like me. Thank you, blog, for representing me in such an accurate light: scattered ideas, covered in pictures and smothered with love (scattered, covered, smothered- anyone want some Waffle House?).  So, I've decided that since it's my blog, it can be whatever I want it to be. It's my journey and my story, right? Who says I can't add DIY posts to my photography blog every now and then? My blog is a big ol' melting pot of all things ME
     Another confession: Pinterest has gotten the best of me. I am an addict tried-and-true. Absolutely no denying it. If you haven't checked this site out, you HAVE to... especially if you're interested in home design, fashion, DIY projects or photography (just naming a few). It's a fun place to find inspiration- which is exactly why I mentioned it. (Fair warning- plan an becoming an addict as well. Don't say I didn't warn you!) Pinterest inspired me to make my own Succulent and Moss Terrarium. Something about succulents make me happy. They are so cute and so full of personality. I often think of my mom when I see them. She has always had them in her house or on the porch ever since I can remember. Anything that reminds me of her is worth having around.
     Making a succulent terrarium took me 30 minutes, at the most. Anyone can do this- it's so easy, and so FUN! It would even be a good activity to do with the little ones.


Materials:  

  • Assortment of Succulents - these can be found at any plant or home improvement store. I found these at Home Depot. They were only $1.50 each- what a steal :) 


  • Terrarium or Glass Jar - I found both of these at Michael's. The large one with a lid was $9.99 and the small one was $3.50.


  • Stones or Pebbles - I've had these lying around but you can get them at Home Depot or Lowe's. Feel free to get creative with color! 

  • Moss and Soil - I actually know of a place on the edge of our woods that's very mossy so I went the free route here. Can't you just invision me digging up moss, in the dark, with a flashlight, and my pajamas on. Hold back the laughter. If you're not into moss spotlighting,  Michael's has foe moss that will do the trick. 


Steps:

1. Place the stones in the bottom of the jar, about 1-2 inches high. This allows the water to drain through the soil rather than sit at the bottom.


2. Very carefully place the succulents in the center of the jar on top of the stones. This was probably the most challenging step. The succulents are very fragile. While holding them in place I accidentally knocked off some of the leaves :( Organize them in a way that is flattering- I tried to place them so that the ones that were the same color were separated by ones of different color. Also, I like altering the heights so that some of the shorter ones were beside the taller ones. Spice it up a little ;) After placing them where I wanted, I spooned soil around the succulents until they held themselves up. I did pack the soil in, but not too tight. Also, make sure you use soil that drains well and isn't as moist as others. Succulents like dry, arid soil. 


3. Lastly, add the moss and Wah-Lah! You're done. Isn't it lovely? Oh, and don't forget to water it, just a little. Now, if only I can keep these guys alive. Wish me luck :) 


Oh, and I made this one for my kitchen window sill. 


Succulent Care Tips:


  • Succulents would rather you ignore them than lavish them with attention. This way they'll actually grow better.
  • When the soil is completely dried out, spritz your succulent with water from a spray bottle to keep it from getting too parched.
  • Full sun is best!
  • If your succulent develops any brown leaves, simply pull them off and let the plant keep growing.
  • Give your succulent a breath of fresh air once in a while by placing it on a porch or a balcony.
  • Ansley | Newnan, Ga Newborn & Maternity Photographer

    What a joy it was to capture Bryan and his wife, Chasity, while they were anticipating the arrival of their first born, sweet little Ansley. Bryan and I go way back- we were friends in high school. (Oh no, did I just say high school was "way" back? 7 years to be exact. Time, where are you going?) When I received a Facebook message from him asking if I'd be interested in taking maternity and newborn pictures for he and his wife I think I squealed. The thought of Bryan being a dad just makes me smile! Of course, I jumped on the opportunity right away. As you will see, Chasity is a beautiful mommy-to-be. Her little tummy was tiny. At one point when she was laying down I asked her to try and poke her belly out because you could barely tell she was preggo. (Wish I would have had that problem, cough) Bryan was so attentive and such a good sport. I had a lot of fun with these two (and a half). Doesn't she just glow?


    It has been such a blessing to be able to take photographs of old friends and their growing families. Being able to capture those special moments have meant more to me than I ever could have anticipated. I truly love what I'm doing.

    The experience of the maternity/newborn package I offer is especially dear to me. I thoroughly enjoy spending time with the expecting parents and then actually getting to meet their new little bundle of joy just a few weeks later. Seriously, I feel like I've hit the baby lottery. It's the best of both worlds! After Bryan and Chasity's maternity session we were all counting down the days. FINALLY, little Miss Ansley made her debut. I packed up my little Volvo 5 days later and headed out to their home where I captured Ansley's newborn portraits. I was especially excited that Ansley was a summer baby because I got to use some props that I'd been holding out for. The babydoll bed was my mother-in-law's grandmother's when she was a little girl- precious, I know. I knew the weather would have to be very warm, and on this day, it most definitely was (those little babies do NOT like to be cold). The nest was handmade by one of my dear friends, Natalie, as a gift (Natalie is also my 2nd shooter for weddings- she's pretty much amazing all the way around). Is that nest fabulous or what?! I was so excited to get Ansley outside in the natural light- thank you sunshine! In addition to the adorable little bed and nest, I finally got to use my newborn girl owl hat. Sherry of Sherry's Lil' Boutique gave me the pink and brown owl hat. You can find her store on Etsy.com- she has some really cute stuff! And of course, being that little Miss Ansley is a summer baby I had to try the watermelon. World, meet Ansley. Isn't she just perfect?         *You can click on the images for a larger view*